How to Setup VPN on D-Link Router?
There have constantly been raising concerns regarding privacy and security in the online world. And, you need to take the essential steps to ensure that your data is safe and private. There are various ways to ensure that, and using a VPN is among the most effective ones. You can encrypt your internet connection using a virtual private network (VPN) on your mobile or computer device.
Moreover, a VPN can also help you encrypt the connection between your router and the connected device. Are you thinking of setting up a VPN network with your D-Link router? Then, follow the steps we have mentioned below to accomplish that in the simplest way possible.
Add a VPN Connection to Your Device
You must add a VPN connection to your device before enabling the same on your D-Link router. The steps for doing that differ based on the device you are using. Here is how you must proceed depending on your operating system:
On a Windows Device
Do you want to set up a VPN between your PC and D-Link router? Then, go to the Start menu on your device and open the Control Panel. Navigate to the Network Sharing Center given in the Network and Internet section.
Click on ‘set up a new connection or network’, which would open a new window on your screen. Select the ‘Connect to a workplace’ option given there, and click on Next.
This will open another window on your screen, where you must select ‘Use my Internet connection (VPN)’. Confirm your settings and close the Control Panel once you are done. You can then enable the VPN connection on your D-Link router’s interface right away.
On Your Mac Device
You can connect to a VPN on your Mac with or without a third-party app. To connect to it without an app, you must open the System Preferences on your device. Then, find and click on the lock icon at the bottom left. Log into your user account, if prompted, or click on the “+” icon right away. This will open a drop-down list with multiple options, and you must select “VPN”.
Then, you must opt for the VPN Type you want to use. Set a Service Name for the connection that makes it easy to identify for you. Click on “Create” to configure the connection. Then, you must type the server address and account name provided by the VPN service. Click on Authentication Settings and select the VPN service’s User Authentication.
Select the Machine Authentication method and provide the required information. Click on OK once you are done. You can then opt for showing the VPN status on your menu bar for easy enabling and disabling. Select the Advanced option and send all traffic over the VPN connection you set up.
This will encrypt all your conventions to the internet. Click on OK, and then on Apply once you are done. You can then connect anytime to this connection by clicking on Connect.
Enable VPN on Your D-Link Router
You can enable the VPN on your D-Link router through its admin interface. Enter your router’s default IP address in the browser to open its login page on your screen. Are you unaware of your router’s default IP address? Then, open the Network section, on your Mac or Network & Internet section, on your PC to find it.
Use the admin credentials to access the interface on your device. If you fail to access the interface, you must check whether you are using the right username and password. Also, make sure you have typed them as they are. You can easily enable the VPN on your router once you access its interface.
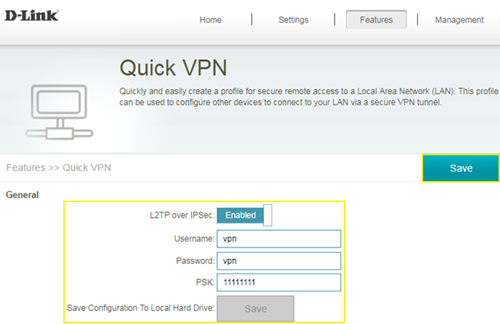
Open the Features section at the top-right and click on “Quick VPN” at the bottom of the drop-down menu. Enable the L2P over IPSec to activate the VPN functionality. You must enter a username and password. Next, enter the Pre-Shared Link (PSK) in the field below the password and click on Save.
Enter the PSK on Your Device
You have to enter the PSK on your PC to authorise the connection. To do that, you must go back to the Network and Sharing Center in the Control Panel. Then, click on the ‘change adapter settings’ given at the left. Right-click the click on Properties to navigate to the Security tab. Select L2P /IPSec under the “Type of VPN” and click on Advanced Settings.
Check the “Use preshared key for authentication” option and enter the PSK in the field below. Click on OK once you are done and close the window.
How to Connect to the VPN Connection that You have Created?
You can start using a VPN connection with your D-Link router after completing the aforementioned steps. Open the Control Panel on your PC and navigate the Network and Sharing Center.
Then, opt for changing the adapter settings and right-click your VPN network. Click on Connect and enter the username and the password of the connection if prompted. Your device will then start using an encrypted connection with your router.
Why Should You Use a VPN Network With Your D-Link Router?
There are more reasons to get a VPN connection than you might think. Here are the biggest ones that you must consider:
Protects Your Private Information
As you might know, various websites and apps track your online activity. And, they might also access certain information that you might want to stay private. In such cases, a VPN is the most effective way to protect your privacy in such cases. It lets you send and receive data anonymously.
Lets You Access Blocked Content
From what it seems, the number of censored content is rising in certain regions of the world. You might have often failed to access a website because it is restricted in your location. But, a VPN network can help you access pretty much any content you want to on the internet.
Helps You Avoid Data Cap
Your service provider might reduce your internet speed after reaching a certain data cap. This is commonly known as data throttling. But, they cannot do so if you encrypt your network. So, you must consider using a VPN to avoid data throttling.
How to Find the Best VPN App?
Do you want to use a VPN app on your device? Then, there are many suitable options available for you out there. And, you must find the one that suits your requirements the most. So, make sure they provide all the features you need. You can also choose between free and paid services as per your preference.