How To Exclude Your IP Address From Google Analytics: A Step-by-Step Guide
Google Analytics is undoubtedly the best tool for collecting business data from websites and mobile apps. Over 28.1 million websites use this free tool to track and monitor online traffic. It helps business owners to optimise their website or app’s performance with real-time monitoring.
However, the data Google Analytics collects can frequently change if your employees visit your sites often. Excluding the unwanted site’s IP address from this tool can help you to get accurate results. So, now the question is how to exclude your IP address from Google Analytics.
There are two ways by which you can remove the IP address from Google Analytics. Business owners can exclude it after logging in to Google Analytics. Additionally, they can remove the IP addresses from a Chrome extension. Both these methods are easy and can be done without any external help.
Let’s learn how to exclude IP addresses from the Google Analytics page.
How to Exclude a Single IP Address from Google Analytics?
You can’t exclude an IP address from Google Analytics without creating an IP address filter. Check your public IP address before creating this filter on this easy-to-use traffic monitoring tool.
Open a reliable web browser, write “What is my IP address” in the search field, and press Enter. Copy and paste the public IP address into the Notepad or any word processor. Then, follow these steps to exclude a single IP address from Google Analytics:
1. Head to Google Analytics Admin Tab
Sign in to your Google Analytics account and select “Admin” from the next page.
Choose the account where you want to create the IP address filter.
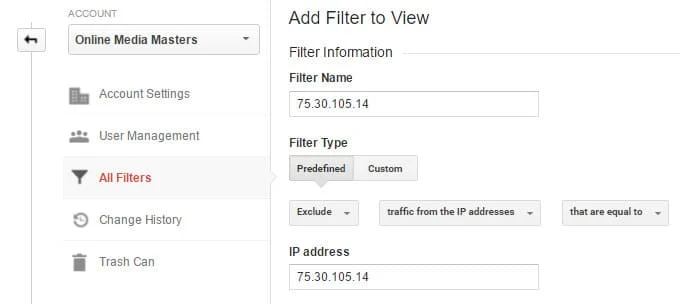
2. Add the IP Address Filter
Navigate to “Account”, tap on “All Filters”, and opt for the “+Add Filter” option. Go to the Filter Name section when the “Add Filter to View” pop-up window opens. Enter a new name like “My Business IP Address” or “Google Analytics IP” in the blank field.
3. Select the Predefined Filter Type
Go to the “Predefined” tab when the Filter Type window appears. Tap the “Exclude” option, head towards the Filter Field”. Write “IP” in the navigation panel, and you will see 2 options – IP Address and IP version. Choose “IP Address” from the filter field’s pop-up menu.
4. Enter the Public IP Address
Move to the “Filter Pattern” section and write the public IP address you found from the Google search. Your device’s public IP will look like this – 122.163.90.55. Public IP addresses don’t start with 192, unlike internal IP addresses.
5. Choose the IP Address You Want to Exclude
Now it’s time to select the IP address you want to exclude from the Google Analytics app. Tap on “Save” to save the IP address in Google Analytics’ Exclude list. No one in your business can now mess with the metrics!
How To Exclude Your IP Address From Google Analytics using Chrome Extension?
Removing IP addresses from Google Analytics might seem complicated for some entrepreneurs. However, you can exclude it easily using a Chrome Extension. Chrome Extensions also let you exclude multiple IP addresses at once.
Here are the step-by-step instructions for excluding IP addresses from Google Analysis using a Chrome Extension:
1. Get the Block Yourself Extension
Open Google Chrome from your Windows device and write “Chrome web store” in the search box. Press the Enter button and click on the Chrome Web Store link. Go to the navigation panel and write ‘block yourself”.
2. Add the Chrome Extension
Select “Block Yourself from Analytics” and tap the “Add to Chrome” option. Click “Add Extension” when the pop-up message appears. Select the three vertical dots on your Chrome browser and select “Extensions” to check if you can see Block Yourself from Analytics.
3. Access the Chrome Toolbar
The Chrome extension will appear in the web browser’s toolbar. Click the Chrome Extension icon, which is located next to the URL address bar. Select “Options” when the pop-up menu appears on the Google Chrome screen.
4. Write the Website URL You Want to Exclude
Copy and paste the website URL you want to exclude from Google Analytics. Click the Add button after entering the website address on Block Yourself from Analytics.
Do you want to block any subdomain of that site? Enter a “*” after entering the website URL. Select “Save”, and Google Analytics will stop monitoring the IP address of the recently added site.
Why Should You Use a Chrome Extension to Exclude an IP Address from Google Analytics?
When using extensions, there is no need to create an IP address filter to exclude IP addresses from Google Analytics. Additionally, adding and removing multiple sites from Google Analytics is easier with Chrome Extension.
Despite these benefits, excluding IP addresses from a Chrome extension has major downsides. For instance, you can’t exclude sites using Block Yourself from Analytics using other browsers; It is only limited to Chrome.
Chrome extensions like Block Yourself from Analytics only work on computers. You can’t use them to exclude IP addresses from smartphones or tablets. Besides, if the Chrome extension stops working or fails to update, it could cause security risks. So, you must always update the Chrome extensions to avoid security vulnerabilities.
How to Exclude Multiple IP Addresses from Google Analytics?
Excluding one IP address at a time can consume ample time and might be tedious. Hence, we recommend removing multiple IP addresses simultaneously to simplify the process.
Here are the quick steps to exclude multiple IP addresses from Google Analytics:
1. Access Your Google Analytics Account
Sign in to your Google Analytics account using the right credentials from your desktop. Go to the “Admin” tab and ensure you have selected the correct account name from the list. Click “View” and scroll down to “Filters” when the next window opens.
2. Add a Filter
Locate “+Add Filter”, tap on it and go to the Filter Name section. Give an easy-to-remember name to your filter, like “My custom filter” or “Computer Filter 1”. Select “Custom” as your Google Analytics filter type.
3. Exclude the IP Address
Select the Exclude option and choose “IP Address” from the filter field. You can now add two IP addresses in the Filter Pattern section. Tap on “Save” after excluding multiple IP addresses from your Google Analytics account.
Can’t Exclude Multiple IP addresses on Google Analytics? Try these Easy Solutions
If you enter incorrect IP addresses, Google Analytics won’t exclude the IP addresses. Additionally, you must use a backlash between the decimals in devices’ public IP addresses. For instance, if the public address is “122.163.90.55”, you must write it as “122\.163\.90\.55” to exclude it from Google Analytics.
Additionally, you can use the pipeline “|” symbol to combine two IP addresses into one. Suppose, you want to exclude the following IP addresses: 122.163.90.55 and 74.125.19.01. Entering a pipeline symbol between these 2 IPs will look like this: 122\.163\.90.\55|74\.125\.19\.01.
Don’t exchange the pipeline symbol “|” with backlashes “\”; Otherwise, Google Analytics will fail to exclude them. Besides, you must check if there is a space between the two IP addresses you want to exclude. Double-check the IP addresses before clicking the Save button in Google Analytics.
Can You Exclude a Range of IP Addresses in Google Analytics?
What if you have to exclude 50+ IP addresses from Google Analytics? It could be tough as you have to write all these IP addresses and add the pipeline symbol between them, taking forever to complete.
Hence, use a regular expression instead of adding “|” after each IP address to filter the IP range. We will make this statement clear by giving you a clear example.
Suppose, your business uses a range of IP addresses from 74.125.19.01 to 74.125.19.50; using “/d” will cover the range between them. Write “74\.125\.19\.\d*” in the Filter Pattern field and click “Save” once done.
The \d” covers the range of digits from 0 to 9. When you write “74\.125\.19\.\d*”, it will cover all the IP addresses that fall in this range. For instance, add and exclude the following IP addresses with “74\.125\.19\.\d*”:
- 74.125.19.2
- 74.125.19.45
- 74.125.19.367
- 74.125.19.506 and other IPs in this range
How to Test the IP Addresses after Excluding them in Google Analytics?
Once you have excluded the IP addresses; now it’s time to check if Google Analytics is monitoring them. Sign in to your Google Analytics account and locate and select “Real-time reports”.
You won’t see any website traffic if Google Analytics successfully excludes the IP addresses. It will take 24 hours to filter the added IP addresses on Google Analytics. So, we recommend checking the business data after a day of removing the IP addresses.
Can You Exclude IP Addresses in Google Analytics 4?
Google Analytics 4 also lets you filter IP addresses from unwanted business sites. Access your Google Analytics account, head to “Admin”, and go to “Data Streams”.
Choose the selected data stream, access the More Tagging settings, and choose “Define internal traffic”. Create an IP filter, click “Exclude”, and write the traffic_type value you’ve entered when defining the IP address. Change the IP filter” to “Activate State” and click to exclude IP addresses.