How to Change NAT Type Asus Router?

NAT type might appear complicated, especially when you are a new router user. NAT is an abbreviation of Network Address Translation, and it works with the translation of the IP address. When you connect to the internet through your Asus router, you might want your IP address to be hidden. If you change the NAT type, you can mask your IP address.
NAT changes your IP address, and you might want fewer restrictions. So, you might be thinking about how to change NAT type Asus router. There are a few risks as you might endanger the overall transmission.
When you modify the NAT type, the data packets are still being received or dispatched from your device. And, if the NAT type doesn’t work accordingly, then there are chances that you lose your data packet or information. Additionally, you might open ports so that anyone can send information to your router through any external IP address and port.
This can be crucial when playing some heavy-duty game on your PC or gaming console. However, if you want to change the NAT type Asus router, you have to follow this guide sincerely.
Well, make sure that your Asus router comes with NAT-type features. Generally, this feature is available from the firmware version 386-41700 or above. Let’s see how you can change the NAT type of your Asus router.
Method to Change NAT Type Asus Router
Before you dive into the mechanism of changing NAT types, you must be aware of something. There are different NAT types available in the settings for an Asus router. For example, symmetric NAT implies that each request from a definite internal IP address and port should reach a unique external port and source IP address.
If the same internal host wants to send a data packet with the same source address and port, but it only differs in the destination, it will map a different route. An external host that receives a data packet from the internal host can only send a data packet back to the internal host.
However, the idea of Full-cone NAT is completely different from the Symmetric NAT. It indicates that any external host can send a data packet to the internal host by using the external mapped address.
Now, how can you change NAT type Asus router? Here’s what you have to follow:
Steps to Change the NAT Type on Asus Routers
Changing the NAT type can be complicated. Ensure that you go through the instructions carefully after checking your Asus router’s firmware compatibility.
- Connect your Asus router to a computer via a wired or wireless connection. Either use an ethernet cable or join the wireless network of your router.
- Now, explore a web browser on your computer and enter the following: http://router.asus.com. This will redirect you to the Asus router’s web GUI login page.
- You need to type the username and password in the space of login credentials. After that, you can click the Sign In button.
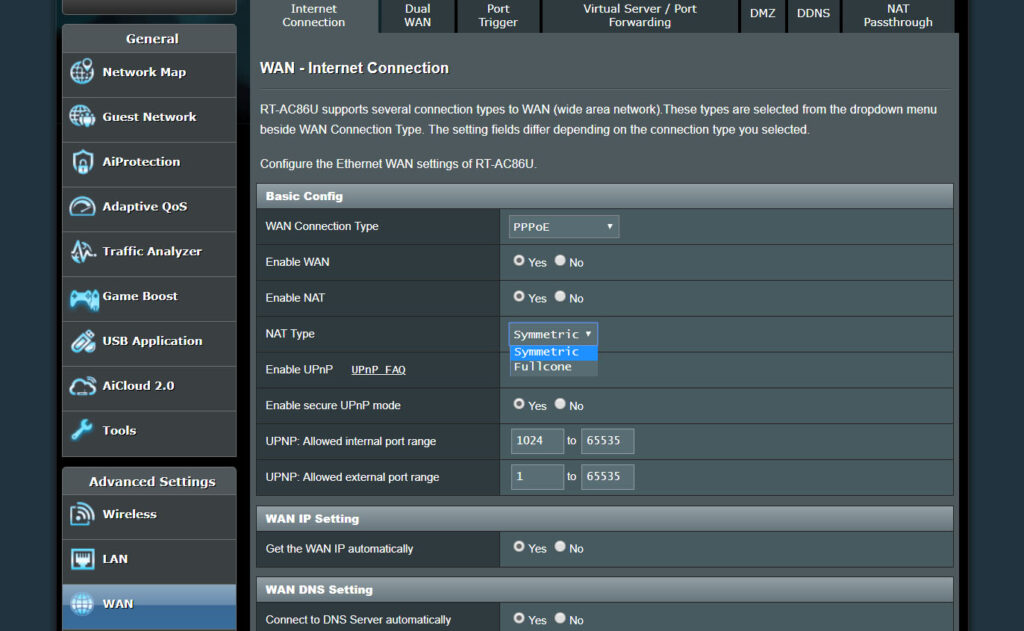
- Scroll the page until you can locate Advanced Settings on the window’s left pane. Select WAN from the list of options.
- Afterwards, go to the Internet Connection tab. Click the NAT type option. You can see two options, and they are symmetric and Full-cone.
Select any one of the options and save your changes. By default, the NAT type is set as the Symmetric NAT. If you want to change that, you can go for the Full-cone NAT type.
Note: Users have reported that they faced issues while entering the web GUI of the Asus router. You might forget the username or password, as well, and in that case, you have to hard reset the Asus router.
On the other hand, you might be facing issues when the Symmetric NAT type is enabled. Therefore, it will be better to switch to the Full-cone NAT type and check if the situation improves.
However, the Full-cone NAT type can be vulnerable as any IP address can send data packets to the intranet. To be on the safe and secure side, you should switch back to the Symmetric NAT type after the issue gets resolved.
How to Configure OpenNAT?
This NAT type is not for everyone, and only a few Asus routers come with the feature that supports the NAT type. When you face restrictions due to NAT type configuration while playing games or using definite services, you can switch to OpenNAT. This feature lets you open ports and lets connections come through your firewall to the home network.
Supported Routers for OpenNAT
Router models such as GT-AXE11000, GT-AX11000, GT-AC5300, and GT-AC2900 can afford this OpenNAT feature. There are routers labelled as RT-AC66U B1, RT-AC68U, RT-AX82U, RT-AX92U, and RT-AC86U in the RT series of Asus routers that can support the OpenNAT feature.
Moreover, the Asus TUF-AX3000 can serve you the same OpenNAT type. Check out the following steps to set up the OpenNAT type on your Asus router.
- Open a web browser and reach the web admin portal of Asus routers. The web address is http://router.asus.com. Type this on the browser’s address bar and hit the Enter button.
- After you have provided your username and password, continue with Sign In. Choose the OpenNAT option from the window.
- Activate the Port Forwarding option. Make sure that you select the game through which you are experiencing connection troubles.
- Additionally, select the platform and enter the IP address in the Internal IP field.
- Afterwards, click the OK button and proceed with the Apply button.
Points to Remember
The procedure to change the NAT type Asus router might vary slightly according to the firmware version. In addition, when you are configuring the OpenNAT feature for a game profile that doesn’t come with the game, then you have to go for the Manual option to create a rule.