TP-Link Router Setup (A Step-by-Step Guide 2022)
TP-Link routers are best known for offering reliable and high-speed internet. Over the years, millions of people across the globe have installed these devices, because TP-Link routers offer a plethora of benefits to their users. With this router, many remote workers have enhanced their web browsing experience. Moreover, when it comes to quality, TP-Link routers are difficult to compete with. Data transmission has become easier after the advent of this router.
TP-Link routers are affordable and can be used for gaming or 4K streaming. Starting from small to large-scale enterprises, everyone is using their routers. Additionally, the users can connect more than 25 devices with the TP-Link router. But, before that, it is important to opt for a TP-link router setup. After buying the device, contact a router installation expert for a hassle-free setup. But, if you have technical knowledge, then set it up by following the below-mentioned steps:
Basic Requirements for TP-Link Router Setup
Before you proceed to the setup process, certain items need to be assembled. Make sure the TP-Link router has a power supply charger. Additionally, there should be a driver disc inside the device’s box. However, some TP-Link models don’t have this disc. In such cases, you have to download the router driver by going to the manufacturer’s website.
Consider providing the right model number and get the latest driver immediately. Moreover, the TP-Link router users need to look for a USB cable. In some of the TP-link router models, there might be even a network cable. And, you need all these to install and use the TP-Link router.
Easy Steps for the TP-Link Router Setup
Setting up the TP-Link router might seem daunting. But, if you know the right steps, the setup process becomes easier. You might find plenty of D-I-Y video tutorials over the internet for the setup. But, most of those are not verified and might be confusing as well.
Don’t follow those, instead implement these steps for an easy TP-Link router setup:
Connect the Power Resources
Start with turning off the router and the laptop or computer. Right after that, connect the modem to the TP-Link router’s WAN port. Use a compatible Ethernet cable to connect both these devices. Then, connect the computer/laptop with the router’s LAN port using another Ethernet cable. Turn on the router, modem and PC/laptop after this.
The latest model of TP-Link router comes with a high-end power adapter. Connect that first, and then locate the power cable of this router. Plugin one end of the power cable into the TP-Link router’s power input. And, take the other end and connect that to the power source. Right after that, connect the necessary wires and cables of the router. If the router is refusing to turn on, replace the wires immediately.
Login to the Router Account
Now, it’s time to get into the TP-Link router’s website. And, for that, open any web browser and go to the address bar and search for the official website of TP-Link. Unable to find that? Then, turn around the router and check the default access section. From there, you can get the legitimate TP-Link website address.
Alternatively, you can try to connect the router via its IP address. Most TP-Link routers have 192.168.1.1 or 192.168.1.1 as their default gateway. Write that in the browser’s address bar to get the login page. Once you get that, provide the correct login credentials of the TP-Link router. Don’t know the password or username of this router? You will find that in the back label of the TP-Link router. Note that, and then try to log in to the TP-Link account again.
Set the Router Configuration
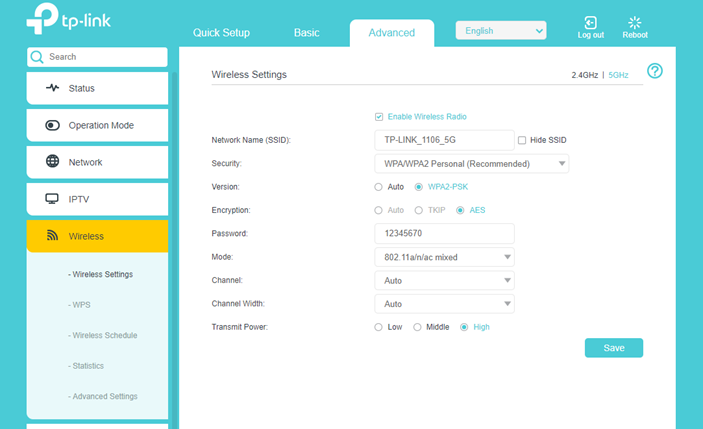
After logging in to the TP-Link router’s interface, go to the Wireless Settings. And, from there, tap on the “Wireless 2.4GHz” option. Right after that, move to the “Wireless Network Name” and set a suitable Wi-Fi name. In some of the models, you will get this option under the “Advanced” tab. Unable to find the “Advanced” tab? It will be under the “Wireless Settings” of the TP-Link router’s login page.
Right after that, head to the “Wireless Security” option, and write the new password. Don’t give a Wi-Fi password that will be easy to guess. Instead, add characters and letters both to make it hard to determine. Don’t forget to tap on the “Save” button after entering the password. Additionally, you have to change the WPA/WPA2 version to “WPA2-PSK”.
In some of the TP-Link router models, you will find the “Version” option under “Security”. Change the “Security” option to “WPA/WPA2 – Personal” and “Version” to “WPA2-PSK”. Then, write the password in the “Wireless Password” section of this TP-Link router model. Choose the “Save” button once you complete this setup process.
And, Lastly …..
The TP-Link router users need to go to the “Status” section after that. Go to the “WAN” option, and then check if the IP address is showing over there. If the modem and the router connection has been established, you can see the IP address. But, if the WAN IP address isn’t there, then power cycle the modem, and the TP-Link router. Turn on these devices, open the configuration page and check the WAN IP addresses. Connect any device with this router and enjoy uninterrupted internet usage.