Router Operation Mode: Everything You Need to Know
A wireless router uses different operation modes to connect with devices. Most users access the Wi-Fi without knowing the wireless mode is available in the router. You can log in to the router to acknowledge which operation mode it supports. After that, users can modify the router settings as per their requirements.
Not all wireless routers have the same mode of operation. The dual-band router’s wireless mode will be different from the single-band routers. However, you may find the AP mode in most routers, irrespective of their type. Besides, manufacturers include the “Repeater mode” in the latest routers.
Most of the wireless router’s operation modes are disabled by default. Thus, you must access the device’s web GUI to enable these features. It will help you to connect multiple wireless devices simultaneously to the router.
Here are the different operations that are found on wireless routers:

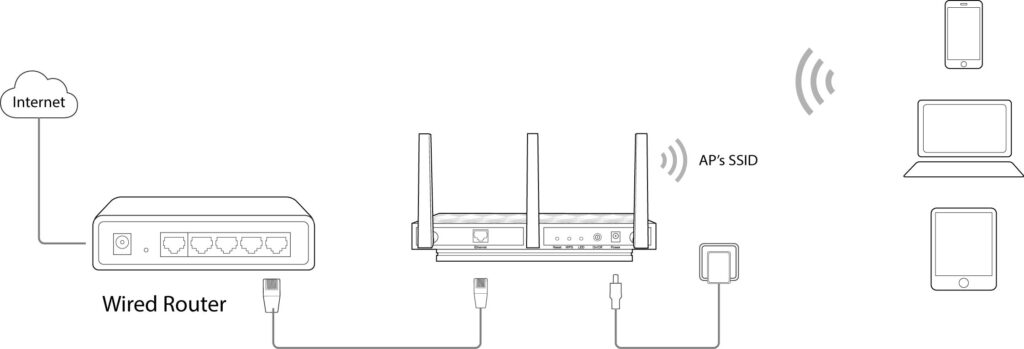
1. Access Point Mode
Access Point (AP) mode lets the users extend the wireless network coverage by acting as a gateway. This operation mode is used to connect wireless devices, like laptops and desktops. It links the internet and a private LAN connection together.
The router’s AP mode helps the users to receive a stable Wi-Fi connection. It eliminates internet-dropping issues. Besides, this mode can send and receive signals more quickly than other modes. Use Access Point mode to reduce the dead spots from the wireless signal.
When Should You Use the Router’s AP Mode?
If you have two routers, set up the second one in AP mode to extend the main router’s network. It will help you to connect the devices within the same IP range on the home network. Besides, you can share large files much faster, using this wireless router operation mode. AP mode is best for offices and other commercial places.
When not to use the Router’s AP Mode?
The AP mode disables the “NAT Forwarding”, “QoS” and “IP” sharing functions by default. Moreover, you can’t use security features, like “SPI Firewall” and “Parental Control”. Users can’t utilise the “Access Control” function when the AP mode is enabled. Thus, it’s better not to use AP mode when using these above-mentioned wireless functions.
How to Enable Access Point (AP) mode in Asus Routers?
Connect the AP router and the main router via an Ethernet cable. Enable the primary router’s “DHCP” feature. Then, connect the Windows or Mac computer to the Asus router, using an Ethernet cable.
Double-tap on the “Wi-Fi” icon and select the wireless router’s network name from the list. Open a web browser and write the Asus router’s default IP address.
Press “Enter” to access the login page and enter “admin” as the router’s username and password. Click “Login” or hit the “Enter” button to open the setup page. Go to “Wireless” and tap on “Administration” afterwards. Head towards “Operation Mode” and enable “Access Point (AP) mode”. Select “Save” and close the Asus router’s setup wizard.
How to Set up a TP-Link Router’s Access Point (AP) Mode?
Connect the power adapter to the TP-Link router to turn it on. After that, users must connect the AP router to the host router using an Ethernet cable. Then, try to connect the computer to the TP-Link router via an Ethernet cable.
Access the Wi-Fi menu and choose the correct SSID from the available list. Open a web browser, enter the TP-Link router’s gateway IP in the address bar and press “Enter”. Next, enter the login credentials when the next web page opens. Hit the “Enter” button to open the TP-Link router’s admin panel.
Go to “Advanced” navigate to “Operation mode” and choose “AP Mode”. You will find the AP mode under the “System Tools” tab in some TP-Link routers. Tap on “Save” and close the TP-Link router’s admin dashboard.
2. Wireless Router Mode
Most users tend to confuse AP mode with Router mode. However, these are two different operation modes and also work differently. You can share one wired internet connection with clients using the router mode. It supports multiple wireless connection types, such as Dynamic IP, PPPoE and PPTP.
Router mode is also named “gateway mode” in the latest wireless routers. This mode extends the Wi-Fi connection into multiple host IPs using NAT protocol. Setting up this wireless mode is pretty simple and less time-consuming.
Do you know how this router operation mode works? The router uses the WAN port to connect the network cable. After that, it provides the user’s internet connection via a LAN port after an IP routing. The router mode also protects the private network from unauthorised users.
When You Should Use the Router Mode?
Router mode helps you to create a guest network. Moreover, you can set a different password in the guest network in this operation mode. Users can block specific websites and filter unwanted IP addresses in this mode. Router mode is also useful for VPN tunnelling.
How to Enable Router Mode in TP-Link Router?
Connect the router to the power adapter and wait until its power LED turns solid green. Plugin the Ethernet cable into the router and PC port. Open the Wi-Fi menu, choose the network name and enter the password when prompted.
Click “Connect”, and then open a reliable web browser. Go to the address bar and enter the TP-link router’s default gateway IP. Press the Enter button to open the wireless router’s login page. Provide the login information and hit the Enter key to open the setup wizard.
Tap on “Quick Setup” and click “Next” to configure the operation mode. Locate “Wireless Router mode” from the pop-up menu and select “Next”. Choose the correct WAN Connection Type (Dynamic IP, PPTP, or PPPoE).
Click “Next” and wait until the TP-Link router’s wireless screen opens. Check the network name and password and click “Next”. Select “Finish” and go to “Operation Mode” afterwards. Enable “Router Mode”, choose “Save” and close the TP-Link router’s configuration page.
3. Repeater Mode
Repeater mode extends the network coverage without changing the SSID and security mode. This operation mode works like a wireless router’s AP mode. However, it transmits the wireless signal over Wi-Fi instead of AP. Moreover, you can avoid network interference when using Repeater Mode.
Users don’t need a 100 cm length Ethernet cable to connect the secondary and main routers. Besides, you don’t have to invest in a Wi-Fi extender if the router has the Repeater mode.
This operation mode allows users to connect to any Wi-Fi signal they have access to. However, you may not find “Repeater Mode” in all wireless routers.
When Should You Use the Router’s Repeater Mode?
You will get a high-speed internet connection in every corner of the house enabling this mode. Wireless router users can overcome internet dropping issues when using Repeater mode.
Do you face issues connecting the computer to Wi-Fi due to distance or physical obstacles?
Set the secondary router as a repeater to access the internet without any hurdle.
How to Enable Repeater Mode in the Linksys Routers?
Open a web browser, and write the Linksys router’s gateway IP in the address bar. Press “Enter” to access the login page and provide the required information. Click “Login” to open the Linksys router’s web GUI and tap on “Connectivity”.
Head towards “Internet Settings” and choose “Edit” afterwards. Go to “Connection Type” when the next window opens and select “Wireless Repeater”. Enter the Linksys router’s default SSID in the blank field.
Move towards “Network Band” and select the prefered Wi-Fi channel. Set the “Security Mode” as “WPA2-Personal” and click “OK” afterwards. Select “Yes” when the confirmation message appears to enable Repeater mode. Check the main router’s IP address after turning on this operation mode.
Did you connect a Windows 10/11 desktop to the Linksys router?
Use the Command Prompt tool to find the gateway IP. Mac users can check the IP address from the Terminal app. You must use this new IP address to log in to the Linksys Wi-Fi router.
4. Media Bridge Mode
Media bridge mode helps users to get the fastest 802.11ac Wi-Fi connection on multiple devices simultaneously. You will need two routers to set up this wireless operation mode. Users must configure one router as a “Media Station” and the other one as a “host router”.
This operation mode extends the Wi-Fi coverage and improves network security. You can prevent IP conflicts when Media Bridge mode is on. Moreover, users can avoid unwanted internet connectivity issues using this wireless router mode. Media Bridge mode allows you to connect devices, like smart TV, DVRs and gaming consoles to the router.
When Should You Use the Router’s Media Bridge Mode?
You must use this operation mode if you are connecting a second router to the network. Moreover, Media Bridge will be useful in creating a mesh Wi-Fi system. Users can overcome NAT conflicts when this router mode is on.
How to Enable Media Bridge Mode in an Asus Router?
Open a browser, and enter the wireless router’s IP address to access the login page. Log in to the Asus router, go to “Advanced Settings” and click “Administration”. Tap on “Operation Mode” and select “Media Bridge”. Choose “Save” and close the Asus router’ setup page.
Failed to Enable the Router’s Operation Mode? Here’s How to Troubleshoot
An incorrect username or password can prevent you from enabling the operation mode. Thus, you must check these router details before accessing the setup page. Reset the wireless router if you forget the password or username.