How to Troubleshoot Router DHCP Error?
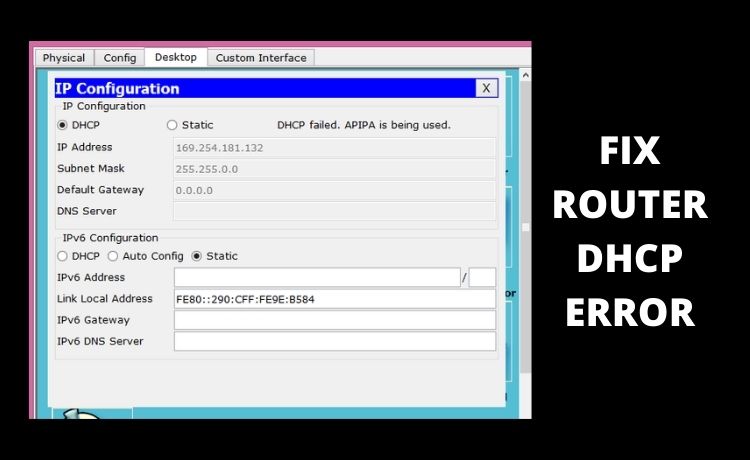
Technical glitches are common and quite inevitable. And, if it’s associated with the internet connection and any device in-between, then you have to find a quick hack to get rid of the issue. Otherwise, all your important work would stay pending. One such common issue is router DHCP error. This error takes place when your network-enabled device can’t get an IP address from the DHCP server.
It can be your Windows computer or your Android smartphone that will connect to the router. But, they might fail to fetch the desired website due to the unavailability of the IP address. Thus, it won’t get connected to the internet. Here’s how you can address the router DHCP error and eliminate the error.
Opt for Windows Network Troubleshooter
If you acquire a Windows device and you’re facing the DHCP error on it, then you can try this method. Before you make any changes to the router, it’s better to check whether the problem is at the device level or not. There are instances in which Windows can fix things automatically.
All you have to do is to run the right troubleshooter for your Windows device. Locate the network icon from the taskbar and make a right-click on it. From the popping-up menu, you need to select Troubleshoot Problems. After that, the troubleshooter will try to determine if there’s any discrepancy with the network connection.
If the related DHCP settings are not configured in the right manner, then it would fix the problem. Make sure that you choose the Apply This Fix option at the end.
Revolve the Router DHCP Error
The router might not have assigned the IP address to your device. To start things from the very beginning, you can try this solution to assign an IP address to your device. You have to simply restart the router rather than reset it. Here’s the entire process that you have to follow:
- Switch off your computer or the network device you’re using.
- Now, turn off your router and modem. Don’t forget to detach the power cord from those devices.
- Wait for a while. It will be better if you give 30 seconds of rest to these devices.
- After that, you can plug in the power cable to the router or modem. Let the devices start.
Next, you have to wait for 5 minutes or so. You have to give the scope to the devices to start at their own pace. Now, you are free to turn on your network device and check if you can connect to the internet through the router.
Change Adapter Settings
If you haven’t found a solution to router DHCP errors for your Windows computer, you can go for this manual function. Go through the guidelines properly and execute them accordingly:
- Click the Start button. Select the gear icon or Settings from the menu. Go with Network & Internet.
- On the Network Status window, you have to look for Change Adapter Options. Once you get it, click on it.
- It will take you to the available network adapters on your computer. Locate the active adapter and right-click on it. Then, go for Properties.
- Under Wi-Fi Properties, choose Internet Protocol Version 4. Now, you can navigate to Properties.
- Select “Obtain an IP address automatically” if it wasn’t selected.
Afterwards, you have to choose OK from the window and then quit it. Restart your Windows device and check if the router DHCP error persists.
Increase the DHCP Range
When it comes to the number of devices that can be connected to the router, then it depends on the DHCP range. Well, it’s almost 250 devices when you consider a home network with any renowned branded router. However, glitches might arise, and the range might have decreased. To make things right again, you can check out the following steps and perform the task:
- You need to log in to the router that you’re using. Explore the web browser and enter the router’s IP address.
- Go to the Network or LAN tab and search for the DHCP Settings. Click on it, and you have to extend the range of the DHCP settings.
- Make sure that you extend it to 192.x.x.253 from 192.x.x.10. And, save the settings. Now, you can try reconnecting to the network.
Update the Router’s Firmware
Sometimes, router DHCP errors might occur in the first place when your router lacks the latest firmware update. The presence of the latest firmware makes sure that your router is free from bugs and comes with the necessary security. Here’s how you can give your router an update.
- Login to the router’s interface. Go to the System or Management tab.
- There you can find the firmware update under a particular tab.
- If there’s any update available, download and install the update.
- After that, you have to restart your router.
Now, you can check if the router DHCP error has been resolved or not.
Finally, a Reset can Help…
You can reset the router to eradicate the issue if it’s still there. Press down the Reset button for a while, and make sure that you have the default credentials with you before you begin. We hope that these methods will definitely help you to fix the router DHCP error as soon as possible.