Ultimate Guidance for Netgear Genie Setup | Quick Hacks
Netgear Genie is an application for both desktop and mobile to manage all the functions of your home router. It facilitates the users to connect to the network, monitor the functionalities and fix all other network-related issues.
Moreover, Netgear Genie also provides another smart setup wizard to connect the extender to an available WiFi network. So, if your router is having the latest firmware, functions well, you can connect it to an extender and manage it by the Netgear Genie dashboard.
Therefore go through the guidelines of the Netgear genie setup that are given below. If you don’t have any technical knowledge, you could easily set up the same if you follow the below instructions carefully.
How do you Set Up Netgear Genie Desktop App?
In this section, we will lead you to the answer of “how to setup Netgear Genie so that you can access smooth internet service using a router.
Download the App
Visit the official page of the Netgear App and go to the download page. You will then get to see the button “Download Now”. Then, tap on that button to download the exe file of the Netgear application. Double-click on the installation file to install the program in the system.
Normally the app starts automatically every time you restart the system. But, if you want to stop this function, you can change it from the Settings of the Netgear app. In the Settings, just uncheck the box of “Enable Autostart”.
Log In
Double -click on the Netgear Desktop shortcut to open the dashboard. To use the full feature of the Netgear Genie app, log in to the router through the app. For that, go to the router settings and type your username, password in the router login page.
Your Internet Service Provider(ISP) should give you the credentials to log into the router. The password is case sensitive.so, whenever you type the username and the password make sure you type in the right case.
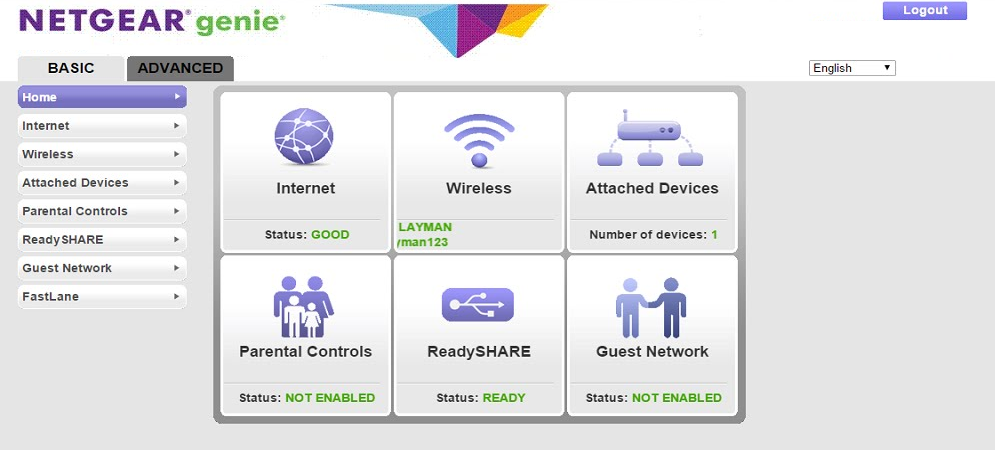
Checking the Internet connection
Tap on the “Internet” tab to see whether your computer is connected to the internet. If you use a wired connection, you can check the status as well. If there is any problem with the internet connection, it might show a red color indication. You can even fix the issue by clicking the same.
WiFi Connection
You can click on the respective option in order to manage the wireless connections that are available in your area. After switching to the option, you can see the list of available WiFi networks. Also, join one by typing the required information. In addition, you can change the WiFi channel by clicking the “Change Channel” button.
How to Set Up Netgear Genie Mobile App?
Netgear mobile app also runs on Mobile as well as tablets. In order to use the mobile app, you need to download the setup file from Netgear’s official page.
Installation
You can also download it from the Google play store for your android device. If you are an iOS user, you can find the app in the Appstore.
Install the App on Android Device
Open the Google Play Store and type “Netgear Genie” in the search box. When the result appears, click on the particular app. On the next screen, tap on the “Download” button and select “Accept & Download” when it prompts. In a while, the download will be completed.
Install the App on iOS
In your iOS device, open the App Store and find the Netgear Genie in the search box. Then, tap the “Free App” button to download the app on your device. Press the icon on the screen to launch it.
Log in to the Router
Once the app is opened, you can see a Login button on the home screen. Then, tap on that option and type the login credentials to sign in to the router. You might have got the information from the manufacturing package or your ISP would provide the same. After logging in to the router, you will be able to manage all the functionalities of the router.
Netgear Genie Smart Setup Process:
Netgear Genie smart setup wizard is a method by which you can set up your Netgear extender easily. In the below section, we will deal with the steps by which you can apply in order to get connected.
- The first step is to connect the extender to a network.
- Launch the web browser and the browser will automatically open the default Netgear Genie smart setup wizard.
- After you connect to the Netgear genie setup wizard, it will ask you to follow further instructions.
- Connect to the Netgear_Ext wireless network and get back to the setup wizard again.
- It will then show you the list of the available networks and choose the particular network to which you would like to extend.
- Click on Continue.
- On the next page, enter the network password in order to connect it.
- After that, you will be able to change the wireless connection settings.
- Choose the respective option to modify the settings, otherwise, you can continue.
- Exit from the setup wizard after performing a cross-check.
In the above section, we have dealt with all the aspects of the Netgear genie setup. Read the instructions very carefully before implementing them. If you face any issues while setting up the Netgear genie, you can contact us. Please share your experience in the comment section below.