How to Configure TP-Link Router Parental Controls?
The internet has answers to every query. But, it might be essential to restrict the network connection to smartphones, PCs, and tablets sometimes. Additionally, you might want to block some specific websites so that other device users can’t access them. All these functions are available under TP-Link router parental controls if you have a TP-Link router.
Parental controls are designed to permit internet access for a scheduled period. Well, you can even mention web addresses that you don’t want to be accessed by users on the network. And, for instance, you can deploy TP-Link router parental controls to restrict the internet connection when your children should sleep or do their homework. Moreover, you can restrict definite web addresses on your router’s network.
However, TP-Link router parental controls are not only meant for children. You can restrict internet access to your employees or block specific websites. So that they can focus on work rather than spending time on social media platforms. If you are a new user with TP-Link router parental controls and their configuration, then this guide will help you.
TP-Link Router Parental Controls: Configuration on PC
You need to connect your router to a network-enabled device so that you can navigate to the web interface of the router. And, TP-Link router parental controls are available under the web admin portal or web interface only.
Once you have connected your TP-Link router to your computer through wired or wireless means, here are the basic steps you need to follow.
Log in to the TP-Link Web Admin Portal
After you have connected the router to your PC, you have to explore a web browser. It can be anything you prefer, such as Google Chrome, Microsoft Edge, Safari, Firefox, or Opera. Now, go to the address bar and type the default IP address of your TP-Link router.
It should be 192.168.0.1 – you can enter the IP address, like this, http://192.168.0.1. After that, you have to type the default username and password in the given space. If you haven’t changed the username and password, they should be admin and admin, respectively. Now, you can hit the Login button.
Configure Parental Controls
Next, you need to click the Parental Controls tab. Click the checkbox beside the Parental Controls option. After that, you have to provide the MAC address of the computer or device that controls its access. Currently, the connected computer’s MAC address should appear in the box of the MAC address.
If you have already registered the network card’s MAC address with the system, then you can use the Copy to Above button. This will copy the MAC address of the Parental PC and the field will get it. In addition to this, you can mention other devices’ MAC addresses that you want to control.
You can manually type the MAC addresses of different devices. Otherwise, you can simply go for the option to select MAC addresses from all the connected devices from the drop-down list. You can copy them one by one to corresponding MAC address fields.
Specify the Schedule of TP-Link Router Parental Controls
It’s time to set the schedule for which the parental controls should be active. Select days and hit the Add button. If you have mistakenly chosen a schedule, then don’t worry. Use the Clear Schedule option to remove the previously set schedule.
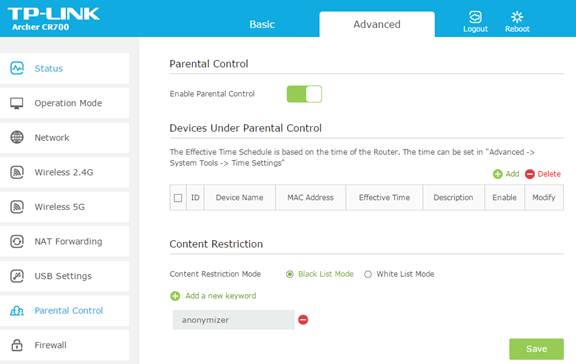
Additionally, you can specify the web addresses that you don’t want to be accessed by your children. Finally, you can click the Save button to confirm each configuration you have made.
Specific TP-Link router parental controls consist of options that prevent searches associated with definite keywords. You need to add those keywords, and all the content regarding that keyword will face restrictions on your router’s behalf.
How to Configure TP-Link Router Parental Controls on a Smartphone?
Configuring TP-Link routers is very easy, and the credit goes to the TP-Link’s application named Tether. Depending on the operating system of your smartphone or tablet, you can install the application from Google Play Store or App Store. After successfully installing the Tether app, you have to work on the parental controls and triggers.
Enable the Parental Control Option
Open the Tether application and fetch the Tools option. Then, you need to go to the Parental Controls option. The Tether app’s advantage is that you can simply enable the Parental Control option. Just toggle the option, and you can also choose connected clients to control the internet access.
After selecting certain devices on the same router’s network, you have to tap the Done button. The next task is to mention web addresses that you want to keep activated for chosen devices. In addition to this, you can set the timing and days according to your convenience.
After selecting every essential and setting the period for parental controls, you can press the Done option. TP-Link router parental controls ensure that assigned devices can’t get to the forbidden websites. Additionally, you can turn off the connectivity for a specific period.
Additional Configuration to Strengthen Router security
There are chances that users might want to bypass TP-Link router parental controls. If you keep your router’s web interface with default login credentials, this gets easier.
It’s better to change the username and password of your router’s admin panel if you want parental controls to be uncompromised. Here’s how you can change the login credentials of your router:
- Visit the router’s web interface and log into it by providing the required login credentials.
- Now, head towards System Tools, followed by the Password option.
- Then, you have to type a new password and save the changes.
Children can be smarter than their imagination and release all those restrictions you have set through parental controls. So, stay a step ahead of them and change your router’s web interface password today.