How to Configure the Asus Router DNS Settings — A Step-by-Step Guide
DNS translates domain names into a specific IP address of the Asus routers. It allows the users to access remote systems by entering the device’s hostname. The Domain System maps a new IP address when the host’s IP address changes. It plays an integral role to connect the wireless routers with the internet. Asus router users can’t load a webpage if the DNS stops responding.
Improper DNS configuration can result in internet dropping issues. Thus, changing the DNS settings will resolve the problem. Moreover, the ISP sets the default DNS settings. ISPs can monitor your online activities using the DNS address.
Many ISPs get to know about the DNS requests when users access an unknown domain. Reset the router DNS settings immediately to prevent ISP hijacking.
More than 80% of people take an expert’s help to change the DNS address or other settings. But, you can do that without any technical support. Place the networking equipment close to the Wi-Fi enabled devices. Update the web browser and router firmware before changing the DNS settings. Restart the wireless router if the browser displays an error message. Connect the computer with the right Wi-Fi to avoid further interference.
Steps to Change the Asus Router DNS Settings
Certain factors need to be determined before changing the DNS settings. Asus router users need to choose a DNS server. Usually, the latest routers have two types of DNS servers – Google Public DNS and OpenDNS.
Do you want to make the browser faster and more secure? Then, change the DNS server to Google Public DNS. But, select OpenDNS if you connect multiple computers to the home network. Additionally, it is important to know the primary settings of these DNS.
Not aware of the Asus router’s gateway IP? Then, it might be difficult to access the DNS configuration page. Besides, you also need to find out the login details beforehand. Otherwise, you can’t log in to the Asus’s dual-band router’s web interface.
Check the label present at the device’s backside to get these details. Alternatively, you can find the username and password on the manufacturer’s website.
Once you get that, follow these steps to configure Asus router DNS settings:
Login to the Wireless Router
First, the Asus router owners need to access the login page. Open a web browser, enter the internal gateway IP, and press the Enter key. Provide the login information, click “Log In” to open the setup wizard.
Did you get the “page can not be loaded” or “site can not be reached” message? It indicates you have entered an incorrect IP address.
Moreover, this error can occur for writing the incorrect username and password. Check these details once to log in to the Asus router without hassle.
Didn’t remember the device’s login credentials? Reset the router, set up a new password and network name. And, then repeat these steps to open the Asus router login page again.
Change the DNS Settings
Now, it’s time to set up the DNS server settings from the admin interface. Go to the “Advanced Settings” from the “Network Map” section and choose “LAN”. Head towards the “DHCP Server” tab, and choose the “Enable the DHCP server” option.
Enter the domain name of the Asus router and write the IP pool starting address afterwards. Additionally, you need to enter the IP Pool Ending Address. Check the lease time default IP address and go to the “DNS and WINS server settings” section.
Click the DNS Server option to enter the primary DNS server address. Write “8.8.8.8” if the Asus smart Wi-Fi router uses Google Public DNS. But, if you choose the OpenDNS server, enter 208.67.222.222 instead.
Click the “Apply” option after completing the DNS configuration process. Close the web interface, and restart the Asus router. Now, check whether there is an internet connection. Did you get the “no internet access” message? Consider changing the default DNS server address to eliminate this error.
How to Change the WAN DNS Server of the Asus Router?
Did you experience security issues on the router even after using the VPN? Change the WAN DNS settings to enhance web security. Switch to Google Public DNS from the OpenDNS server.
Connect the Wi-Fi enabled devices to the Asus router via an ethernet cable. Then, open a reliable web browser, enter the private gateway IP and press the “Enter” key. Enter the default username and password, click “Sign In” to access the web GUI.
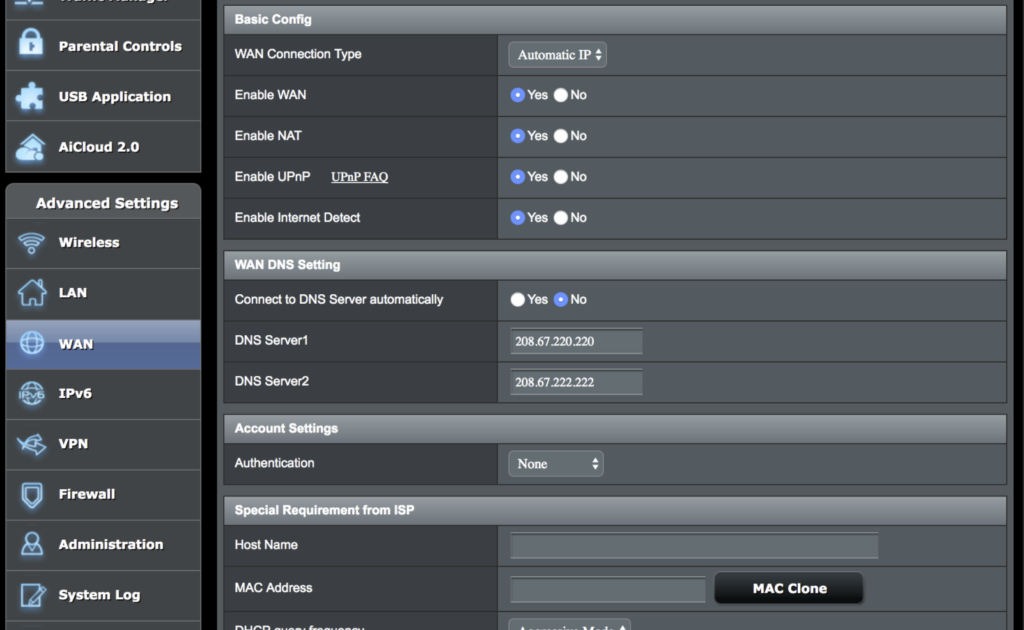
Move towards the “Advanced Settings” section, and tap on “WAN”. Go to the “Internet Connection” tab, and check the basic configuration. Enable the “WAN”, “NAT” and UPnP” options and change the WAN connection type to “Automatic IP”.
Besides, the users need to disable the “Connect to DNS server automatically” option. Wait until the DNS Server 1 and DNS Server 2 field pops up.
Enter the primary and secondary DNS server addresses there. Don’t know what the Google DNS server’s addresses are? Write “8:8:8:8” in DNS Server 1 and 8:8:8:4 in DNS Server 2. Choose “Apply” after configuring the Asus router’s WAN DNS server settings.
The router will disconnect the internet after changing the DNS server. Wait for a while and reboot the device to restore the Wi-Fi connection.
How to Check the Asus Router DNS Server Information?
Asus included a Network Map feature in the wireless routers. It lets the users check the list of connected devices. Check the device’s encryption type from this section. Additionally, you can see the DNS server-related information enabling this option.
Access the web interface using the default IP address and click “Network Map”. Choose the “Internet” option toggle on the “Internet Connection” option. And, then disable the dual WAN option and go to “DNS”. It will display the primary and secondary DNS server addresses.
How to Troubleshoot the Asus Router DNS Settings Error?
Many users failed to connect to the internet after configuring the DNS settings. Change the network settings in certain circumstances to solve the problem. Switch to a different browser to check the router’s DNS connection.
Enable Safe Mode while changing the Asus router DNS settings. Disable the antivirus program and Windows Defender. Contact a router expert for more effective solutions.