How to Access USB Drive on TP-Link Router – A Step-by-Step Guide
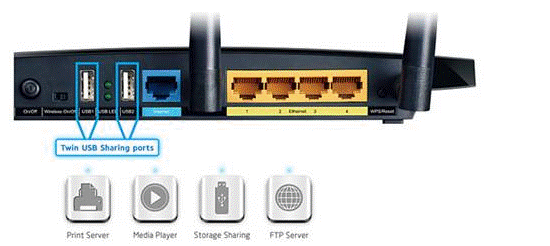
TP-Link routers have the advanced USB 2.0 port that allows storage drives sharing. Users can transfer large files using the networking sharing function. Back up the files in the compatible USB flash drives by connecting them to the router.
Download movies and email attachments from the computer using the USB sharing port. This feature will also work on the latest Android and iOS devices. But, you need to configure the file-sharing option from the TP-Link router first.
Though, it is relatively easy to share the access of the USB drive to the router. But, you might need an expert’s help while connecting these two devices. Ensure that the ethernet cable is connected to the TP-Link router. Check which type of USB drives you can link with this wireless device.
Otherwise, you might face hindrances while transferring the media files. Repair the TP-Link router’s USB ports if you can not plugin the storage devices.
Do you need to access the USB drive on the TP-Link router? Enable the TP-Link router’s file sharing feature to do that.
Easy Steps to Enable the File Sharing feature on TP-Link Router
Most old and latest TP-Link routers have the File Sharing feature. It lets the users share a USB drive connected to the router with other wireless devices. Connect the devices with the same wireless network for a hassle-free file transfer.
Then, plug the USB drive into the TP-Link router’s USB port immediately. Wait for a while until the device’s USB LED light blinks. Access the dual-band router’s admin interface afterwards.
Head to the “Advanced” tab, select “USB Settings” and opt for the “Device Settings” option. Now, check whether the TP-Link router has identified the USB drive. Click on the “Scan” option if you didn’t notice the USB drive name in this section.
Moreover, you can try unplugging and then plugging the USB drive again in the router’s port. Enable the ‘Network Neighborhood’ option and toggle on the “Share All” option.
Check whether the “Enable Authentication” option is enabled and head to “Sharing Account”. Click on “Use New Account” to create a new account for the USB drive. Or, you can choose the “use default account” and enter the TP-Link router’s login information.
Choose “Save” and choose the files you want to share when the next window opens. Disable the “Share All” feature and choose “Add” while sharing the sensitive data.
How to Access USB Drive on TP-Link Router from a Windows Device?
Hold the Windows and R keys together and wait until the Run dialogue box pops up on the screen. Write “\\Share_XXXXX” there, press the “Enter” key or click on the “OK” button. Here, “XXXXX” denotes the model number of the wireless router.
A Windows security window will appear where you have to enter the login information. Tap on the “OK” button to access the USB drive’s files or folders on the TP-Link router. Alternatively, you can write the router’s IP address in the dialogue box to do this. Contact a router expert if you fail to access the USB drive from the smart Wi-Fi router.
Steps to Access USB Drive on TP-Link Router from a Macbook
Open the macOS device’s system tray, click on “Go”, and select “Connect to Server”. Move to the server address bar, enter”smb://xxxxx-Share”, and tap “Connect”. Enter the TP-Link router’s default IP address if this command did not help you access USB drives. Moreover, the users can enter the router’s official address to connect to the storage device.
How to Access USB Drive on TP-Link Router from a Linux Device?
Click on the Linux device’s menu bar and select the “Places” option. Navigate to the “Connect to Server” tab and when the next window opens, go to “Server”. Enter the router model number first and add “-Share” with it. Choose the port number where the USB drives are connected. Move to the “Type” section and choose the right service type.
Select “Windows Share” if you share the USB drive with a Windows PC. Write the folder name in the “Folder” field and enter the domain name. Then, consider writing the TP-Link router’s username and password and tap on “Connect”. Share 1TB file within minutes in the selected Wi-Fi-enabled devices easily. Don’t turn off the router while using the file-sharing feature.
How to Access USB Drive on TP-Link Router from an Android Device?
TP-Link router users can not directly access the files shared from the USB drive. You need to download third-party software to continue with this process. Open the Play Store and find a reliable File Manager app from there. Tap on “Install” and wait until the application gets stored on the Android device.
Now, go to the smartphone or tablet’s “Settings”, click on the “Wi-Fi” or “WLAN” option. Choose the TP-Link router’s wireless network open the File Manager app. Locate the “Network” option and select “LAN” afterwards from the drop-down list. Now, choose the “Scan” option and wait until the Android device displays the TP-Link router name.
Click on that to view the folders on the connected USB drives. But, the steps to access the USB folders might vary from one app to another. Thus, if you fail to find the required files, contact an IT expert immediately.
How to Access USB Drive on TP-Link Router from an iOS Device?
Like the Android devices, you will also need a File Manager to check the USB drive media. Moreover, there are several file management apps available in the App Store. Choose an app tap on the “get” option to install that on the iPhone or iPad. Open the application, choose a server and enter the LAN IP address of the TP-Link router.
You might have to enter the router’s username and password afterwards. Once done, click on the “Save” or “OK” button and access the USB drive’s files now. Can’t find the files? Then, you might have entered an incorrect router IP address. Check its default gateway once and repeat these steps to access the USB file storage.