How To Set Up A Static IP Address: A Comprehensive Guide
Assigning a static IP address is quite an important configuration that can help you in many ways. If you are planning port forwarding, then set a static IP address is important for you.
While you are sharing files, then also a Static IP address is needed. For this reason, you should know how to set up a static IP address in your device.
In case, you don’t set up a static IP address, then your device may stop working eventually. Every device has its own IP address that is useful for server hosting and sharing files as well.
Keeping this in mind, here we are going to discuss some amazing methods that will definitely help you to know the setup process.
By using the DHCP settings, you can also configure your router device to set a static IP address. Hence, keep following the article from first to last to resolve all your doubts at the earliest possible.
How to Set up a Static IP Address Windows 10? Stepwise Instructions
Here are some effective ways that can help you to set up a static IP address. Moreover, it helps you to remove the issues you are facing now. Hence, have a deep look at the rest of the article and implement the steps exactly the same as stated below.
Set a Static IP Address Using Command Prompt
By using Command Prompt, it is quite difficult for you to set up a static IP address but then undoubtedly it is the most effective method for you.
To do the same, the very first thing you have to do is to click on the Start button and then on the Search tab. After that, write down Command Prompt in the search bar and press the Enter button.
Then, select Command Prompt by right-clicking on it and choose the Run as Administrator icon as well. Now, start to write down the command “ipconfig /all” in the box and press the Enter key once. Now, you can see the Adapter Name as shown below:
IPv4
Subnet mask
Default Gateway
DNS Servers
Again, open a Command Prompt and write down the following commands one after another to complete the setup process.
netsh interface IP set address name=”Ethernet0″ static 10.1.2.220 255.255.255.0 10.1.2.1
netsh interface ip set dns name=”Ethernet0″ static 10.1.2.1
netsh interface ip add dns name=”Ethernet0″ 8.8.8.8 index=2
Once you have entered all the commands, start a test and check if the internet is working or not. Now, launch a web browser and open a website to check if the process is workable or not.
Set up Static IP Address Using Control Panel
In case, the Command Prompt procedure is not helpful for you, then you can try out this one. The very first thing you have to do is to navigate to the Control Panel and click on it.
After that, tap on the Network and Internet icon. From the resultant window, choose Network and Sharing Center and click on it. Then, look at the left pane of the screen and tap on the Change Adapter Settings option as well.
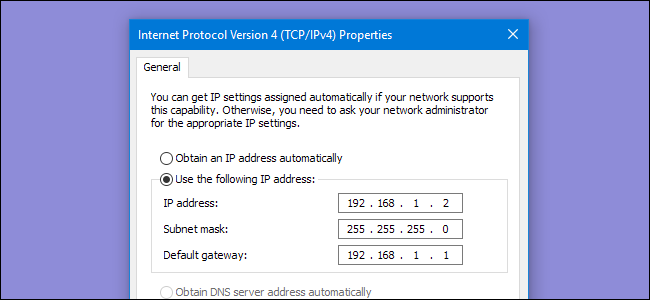
From the next page, select the Network Adapter by right-clicking on it and choose the Properties tab. Here, click on the Internet Protocol Version 4 icon and again tap on the Properties icon.
After that, choose “Use the following IP address” option and assign an IP address, the Subnet mask, the default Gateway one by one. Now, you have to enter an alternative DNS server and click on the OK icon. Now, click on the OK icon and choose the Close option to complete the task.
Once you have finished all the processes, launch a web browser and check if this solution is helpful for you or not.
Assign Static IP Address Using PowerShell
Windows 10 has a PowerShell command line that helps you to manage networking settings by the NetTCPIP module. Go through the steps cited hereunder to assign a static IP address.
First of all, press down the Start button and look for PowerShell. Once you found this option on the result page, just select it by right-clicking on it and click on the Run as Administrator option.
Now, you have to type the command “Get-NetIPConfiguration” and click on the Enter button. You will see four options on the screen. Just note down them.
InterfaceIndex
IPv4Address
IPv4DefaultGateway
DNSServer
Now, again launch the Command Prompt and type the following commands. Do not forget to hit the Enter button after putting each command.
New-NetIPAddress -InterfaceIndex 4 -IPAddress 10.1.2.220 -PrefixLength 24 -DefaultGateway 10.1.2.1
Set-DnsClientServerAddress -InterfaceIndex 4 -ServerAddresses 10.1.2.1
Set-DnsClientServerAddress -InterfaceIndex 4 -ServerAddresses 10.1.2.1, 8.8.8.8
After completing the above steps, try to open a web browser and check if the internet is working fine or not.
Set up Static IP Address Using Settings
You can also set up the static IP address for both the wired and wireless adapters. Here are the procedures you may follow.
Assign a Static IP Address for WiFi Adapter
If you are using Windows 10, then you can also change the IP address from the settings. Here are the procedures to do so.
First of all, click on the Settings option and navigate to the Network & Internet option. After that, tap on the Wi-Fi icon and select your present connection. Now, navigate to the IP settings tab and click on the Edit icon.
Now, click on the drop-down menu and choose the Manual icon. On this page, you have to turn the IPv4 toggle option on and assign a static IP address from here. In addition to this, you have to set the subnet mask, default gateway address, preferred DNS, alternate DNS.
Once you have completed all the methods, then click on the Save option and check if this method is workable for you or not.
Set Static IP Address for Ethernet Adapter
At the initial step, click on the Settings tab and navigate to the Network & Internet option. After that, click on the Network & Internet tab and choose the Ethernet option. Find the connection you are using and click on it.
Now, locate the IP settings and click the Edit button. By using the drop-down menu, choose the Manual option and turn the IPv4 toggle icon on.
Then, you have to set a static IP address, subnet prefix length, default gateway, preferred DNS, alternate DNS one by one.
Do not make any mistakes while you are setting these options. At the final step, click on the Save button and open a website using a web browser.
Final Words
Well, we hope the above solutions will be enough for you to know how to set up a static IP address.
Whatever the process you choose to set up the IP address, we recommend you keep the address within the network range otherwise it can create conflict between the device and the internet connection.
In case if you need any further help regarding the same query, then get in touch with a professional who can help you by providing more advanced solutions.