Belkin Router Port Forwarding — How to Proceed?
Port forwarding allows the Belkin routers to set up firewalls on the network. Many tend to confuse port triggering with port forwarding. But, both these processes work in different ways.
With port triggering, you can set up the router to access public services outside the network. But, port forwarding prevents the Belkin router users from doing that.
Once you enable this feature, you can access public services over the internet. And, these include web servers, FTP, internet-based applications, email and game servers.
Moreover, this Belkin router feature can protect connected devices from hackers. It limits network access and adds an extra layer of security.
Besides, you can block the incoming traffic and improve the browsing experience. Connect the router with multiple client networks without losing the internet. Enable this high-end feature to get these benefits.
Don’t know how to opt for Belkin router port forwarding? Follow this guide to get in-depth knowledge:
Requirements for Belkin Router Port Forwarding
Before proceeding to the port forwarding steps, it is important to check a few things. Otherwise, it might take an ample amount of time to complete the process. First, you need to know about the wireless router’s IP address. Belkin has assigned the 192.168.2.1 gateway IP in most of the routers. But, this might vary depending on the router model you use.
Not aware of the Belkin router’s internal IP address? Open the Windows device’s Taskbar, write “cmd” in the search box and press “Enter”. Wait until the Command Prompt window appears, then write “ipconfig/all”.
Hit the Enter key and locate the “Default Gateway” section to find the gateway IP. Alternatively, you can check the router’s IP address from the Control Panel app. Additionally, the Belkin router users should check the port numbers.
Didn’t remember the actual TCP/UDP port numbers? Open the Command Prompt window, write “netstat -a” and press the Enter key afterwards. It will display the TCP or UDP port numbers of the device. But, if you didn’t see that, check the Wi-Fi connection. Restart the Belkin router if the power LED is blinking continuously.
What else Should You check?
That’s not all! You need to ensure the computer is connected to the right SSID. Connect the ethernet cable to the right router port. Update the Belkin router’s firmware. And, never place the networking equipment far from the computer.
Otherwise, you might face connectivity issues during the Belkin router port forwarding. Always use a reliable and updated web browser to avoid security issues. Open the router manual and note down the default login credentials.
How to enable the Belkin Router Port Forwarding Feature?
Turning on the Belkin router’s security feature is not that difficult. It can be done within a few minutes after accessing the configuration page. But, many faced issues getting into this router webpage. And, it usually occurs for entering incorrect IP or login information.
Check these details carefully, and then follow these steps for port forwarding:
Enter the IP address
Generally, a Belkin router’s IP stays the same if you haven’t changed it. Did you change the default gateway IP of the device? Tap on the Wi-Fi name, and click “Open Network and Sharing Center”. Head towards the “Connection” tab when the next window opens and select “Wi-Fi”. Choose “Details” when the Network Status window pops up.
Move towards the “IPv4 Address” section to check the IP address. First, you have to open a web browser, then go to the URL bar. Write the private gateway IP and press the “Enter” key.
Wait until the next page loads. Did you get the “page can’t be loaded” message? It implies that you have provided the right router details. Reset the device in certain situations to fix this problem.
Login to the Wireless Router
The login page will open if you have entered the correct IP address. Write the default username and password in the blank fields and press the Enter key. Usually, Belkin uses “admin” as the username and “password” as the password.
But, if you are using an old Belkin router model, enter the password in the “username” box. Click the “Submit” button after providing the login details. It will open the Belkin router’s configuration page. And, contact the ISP if this login page is not loading.
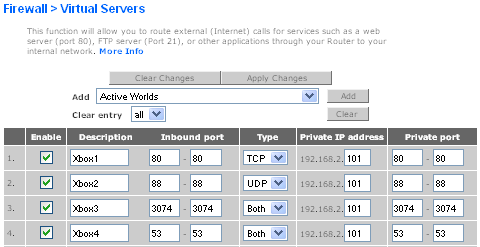
Create Virtual Servers
Once you log into the admin interface, go to the Firewall section. Locate the “Virtual Servers” option, tap on “Add”, and then toggle on the “Enable” checkbox.
Additionally, you need to choose the port forwarding protocol for the router. Change the port type to TCP or UDP. And, if the device uses both TCP and UDP, select “Both”.
Enter the port number on the “Inbound Port” and “Private Port” sections. Check the private IP address and the server name. Click “Save” to complete the Belkin router port forwarding setup.
Restart the router, and it will start assigning IP addresses to the connected devices. Disable and enable this feature; if the router stopped working after enabling it, disable and enable this feature.
How to Open the FTP Port on a Belkin Router?
Access the router’ setup wizard in the first place to open the FTP port. Go to the “Advanced Settings” tab, tap on “Firewall”, and then select “ Virtual Servers”. Head towards the “Add” section and choose “FTP Server” from the list.
Tick the “Enable” checkbox and write “21” in the Inbound port section. Change the “Type” to “TCP”, and ensure the IP address is set to “192.168.2.52”. Now, go to “Private Port”, write “21”, and choose “Apply Changes”.
Troubleshoot the Belkin Router Port Forwarding Issues
Some Belkin router users reported they have issues with port forwarding. Usually, it occurs while using an incompatible modem to the router. Change the modem to resolve this issue. Power cycle the networking equipment if you can’t enable port forwarding.
Disable the Windows Defender Firewall from the Windows devices. Besides, you should uninstall the antivirus programs to prevent getting this error. Contact a router expert if these solutions don’t work.