Asus Router Firewall: Things You Shouldn’t Miss
In today’s rushed digital world, you have to keep your data safe. Otherwise, cybercriminals can sneak into your home network and get to your device content, personal details, banking information, and much more.
Now, assigning anti-malware or antivirus software to every device might not be possible. However, you might be unaware that you can get a robust security option through the in-built firewall of your router.
Most wireless routers do come with a hardware-based firewall, and it stays dormant if you don’t activate it. In case you have an Asus router, then there are chances that you can enable the Asus router firewall and strengthen your home network without spending extra bucks. If you’re an amateur regarding Asus router firewall settings, this guide will help you learn how to enable the settings and much more.
How to Enable the Asus Router Firewall?
All the Asus router settings are available in the admin dashboard or web interface of the router. You need to check the web admin dashboard to enable the Asus router firewall. The default value of the router firewall is Enabled.
However, you must check it and take no chances with the security of your home network. Here’s how you can reach the Asus router firewall settings.
Sign in to the Asus Router’s Admin Panel
Connect a computer to your Asus router through wired or wireless means. Now, your computer should be connected to the internet. Open a web browser on your computer and move the cursor to the browser’s address bar. Type http://router.asus.com or simply type the IP address of the Asus router, that is http://192.168.1.1.
Afterwards, press the Enter button to get the Sign In page of the Asus router. Next, you must provide the username and password on the specified boxes. If you haven’t changed them since you purchased the router, enter the default login credentials. Otherwise, you can provide the credentials that you have set earlier. You can now click the ‘Sign In’ button.
Go to Firewall Section
Welcome to the admin dashboard of the Asus router. Here, you can make necessary changes to your router and its configuration. To implement any changes regarding the Asus router firewall, you have to scroll down and find the Advanced Settings option from the left pane of the screen.
There should be a firewall option under Advanced Settings. Click on the Firewall option, and from there, you can check whether you have enabled the option or not. If it’s not activated, make the ‘Enable Firewall’ option a Yes.
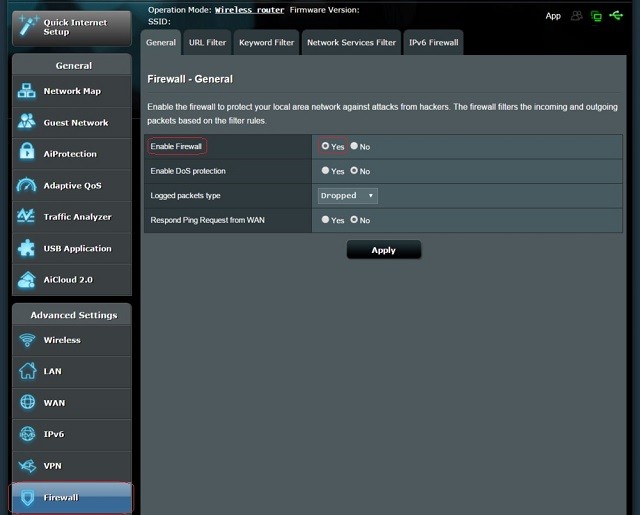
Steps to Accomplish General Settings under Asus Router Firewall Option
There are other security aspects that you have to look after. Here are a few steps that you can perform to make your router security firmer.
- Hopefully, you are on the admin dashboard of the Asus router. If you clicked on the Firewall option from Advanced Settings, you might have reached the General tab under Asus router Firewall settings.
- Make sure that you enable the firewall. Additionally, enable DoS protection.
- Next, you have to choose Logged Packet Types from the drop-down menu. There are four options available, and they are : None, Dropped, Accepted, and Both. Proceed with the option that suits your preferences.
- After that, there is an option that says ‘Respond Ping Request from WAN’. You can enable this option if required.
- Finally, you have to click the Apply button from the bottom of the screen.
Can you Set up a Network Services Filter on your Asus Router?
The best part of in-built Asus router firewall settings is filtering network services. The feature of the Network Service filter is to block the packet exchanges from LAN to WAN. additionally, it restricts other devices from browsing dedicated network services.
For instance, you can input port number 80 in the destination port field, and the specified device can’t use the internet. If you want to apply the same rule for all LAN devices, you have to keep the source IP field blank.
However, there are two distinct durations for the Network Services filter operation. During the Black List Duration, the clients specified in the Black List can’t access the mentioned network services. After the duration is over, the clients in the LAN can access the network services.
On the other hand, clients mentioned in the White List can only use the services specified for the Network Services. However, once that duration gets over, White-listed clients can’t access those services mentioned in the network services. Moreover, they can’t even access the internet.
Steps to Set up the Network Services Filter on Asus Router
Locate the Network services Filter from the Firewall option on the admin dashboard of the Asus router. Setting up the Network Services Filter is important for Asus router firewall protection. Here’s what you need to do:
- After you reach the Network Services Filter tab, choose Yes to Enable Network Services Filter.
- Select your list or filter table type. The available options are either White List or Black List.
- Elect the type of application. Additionally, you can go for the User-defined if you want to define it yourself.
- Next, you need to set up the schedule or duration. Set the time and date range for the devices.
- Input your preferences in the Filtered ICMP Packet Types field if necessary.
- Now, set up the network service filter to block the packet from the source IP. If you want to add more profiles or configure anything in this Asus router firewall settings, click the ‘+’ option.
- Once done, you can click the Apply button to save your changes.
Is there anything else that can Add more Security to your Home Network?
Enabling the Asus router firewall is not everything when looking for the safest network. Set your wireless connection encrypted through WPA2-AES. Additionally, set up different passwords for the router’s admin dashboard and wireless connectivity at your home.
Make sure that you keep your passwords long and complex. Keep updating your router firmware and enable AiProtection for best results.